Tuesday, December 23, 2008


Hello everyone. As expected with the Holiday season has made progress on the barn very slow. Paint doesn't want to spread and when it does the humidity seems to make it take forever to dry. But we are gearing up for the push to finish in the Spring.


But the main focus of this post is the framing. I really deliberated as to if I should frame within the red iron or up to it, inside the building. We decided on a combination of the two. Attaching the wood to the iron was also a problem. Drilling was too time consuming, self tapping screws where a bit better. No, the best most secure method turned out to be power actuated fasteners manufactured by Remington. These babes work...end of problem. We used them to attach the 2X4 studs to the iron, and also used them to anchor the bottom plates to the concrete. Check out these shots of the framing.

Tuesday, December 2, 2008

The design

I think I got the idea from a having seen a television series back in the day called Dan Tanna...check it out...maybe 5 minutes worth of classic tv...http://www.youtube.com/watch?v=01iKDegrW_g
Whats cool about the thing is how he lived in a metal building and just drove his car right into his living room...now that is cool!!! I was impressionable.
In later years I was invited to a hanger home on some airport near Fort Worth, Texas, and really saw just how far you could go with that concept. No, or very little exterior maintenance and for the most part it would last forever...So this is where I hatched this crazy plan...the wife thought it sounded reasonable and off we went.
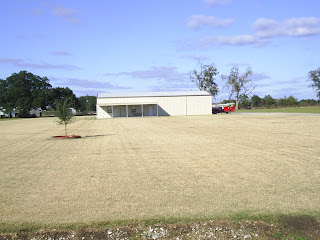
It isn't unheard of to build your shell yourself, but that does require a knowledge and skill of heavy equipment and fabrication with heavy iron and the like...we took a pass and just contacted a steel building contractor and layed out what we wanted. As discussed earlier, the pad took 10 days and the building around 14 days for erection. The overhead doors where specified and ordered before a single beam went up. One is 12'X10' and the other is 10'X10', roughly $1000 dollars each installed. The plan was simple I thought...buy and store building materials...bought at discount, or in quantity, and build inside out of the weather. So far it has worked...I'm the fat Dude in the picture, so the building part was a challenge. I would go from basically an airconditioned office to wearing a 30 pound tool belt and really working...on my days off from my Job...I had to go back to work just to rest...
I had some experience in all the construction trades, but not in years!!! I knew how...just took twice as long...But at least being inside we avoided being in the sun and heat and rain..
I'll try to import my plans...and give greater details in the following entries!!

Wednesday, November 26, 2008

Fast forward!!


Well a lot has happened since we started this little project. Thank you for all your comments and I really appreciate all the support from family and friends that have been following this blog. The building contractor had a slow start and the building took about 14 days to complete. So it was in the middle of winter and the winds where relentless!! Many pictures I had intended to post where lost due to our transition from Houston to the construction site...it was a really challenging time. But I still have many to show ya!! This our gang...a motley crew I admit...The boss is taking the picture...

We got our first load of materials the 14th of April. My friends, Scott and his som AJ arrived the day before and we spent a lot of time pouring over my drawings of the project.


We poured concrete February 8th 2008...what a day!!! Here are a few shots of the results after finishing. I failed to place anchor bolts in the concrete for the walls, I beat myself up over that, but later used drilled swag type bolts and it all worked out. Framing of the well house began as soon as the concrete cured and it was a blast finally getting to cut some boards!!!

Saturday, October 11, 2008

Laying the foundation


Hello! Well it has been a while since I've had time to blog...but WoW!! The project is really in motion now. We didn't get started the first week of January 2008 as hoped, the weather was not helping. We poured the foundation and drive-way pad around the 8th of February. The building contractor sub-contracted it out to a crew he had worked with before, and it all went very smoothly.

I was especially amazed by the amount of steel reenforcement they used in the pad. Check out the size of the trenches around the sides and down the middle of the whole thing!

It took several hours for the crew to get the surface finish and texture of the porch area (12'X40"), the way they wanted. The wife and I just waited and watched like expectant parents... We where told that now it would be a minimum of ten days before they could begin the erection of the metal structure...and it was at least that.. More on that later.

Sunday, November 25, 2007

Making big plans


We had a great Thanksgiving with our family in Breaux Bridge LA. and we hope you all had a great holiday as well. We are also excited because we had the opportunity to sit down with our friend Dede and His wife Josie, and discuss ideas for the floor plan. Dede is a retired architect, and has been down this same road, I mean having built a small garage home to live in while they built their big house. He has lots of experience and ideas to bring to the table.

While out there we had the chance to drive around and look at some of the barndominiums there. Here are a few shots of ones we especially liked!

slow but steady...

Well as you can see I have gotten some pictures of our place up now. Here are just a couple of the most recent additions. The electric pole and meter box, and the new water well and pressure tank. I'm pretty sure that the well guys had to go around 300' because neighbors on both sides of us had to go that deep. Notes to all who follow our steps: The drilling of the well isn't cheap! Our Well service charges $14 a foot and has a minimum charge of 200 feet...Although I haven't received the bill as of this post I anticipate paying at least $4200 just for the hole...cased sanded and ready to except the pump. The pump I am using is a submersible type with the surface pressure tank. The pressure tank reduces pressure bumps as the down-hole pump cycles on and off, and it provides a constant pressure to the service. I also expect the pump and pressure tank, pressure switch and all associated plumbing, to add up to near $3500 more. It is really cool how these guys do business with just a handshake and my word...but I'm sure they wouldn't hesitate in taking it all back, if the check isn't on its way!!